The Remote Desktop Protocol (RDP) is a very useful utility that enables the user access and control a remote computer from his or her personal device. It can be extremely helpful in multiple ways like in case of working remotely, accessing files from another computer, and providing technical support to someone who is not physically present. However, the concept of using RDP often scares people, and they may not clearly understand where to begin.
Understanding Remote Desktop Protocol
So, what exactly is Remote Desktop Protocol (RDP)? It’s a proprietary protocol developed by Microsoft that allows you to access another computer over a network connection in a graphical interface. This means you can interact with a remote computer as if you’re sitting right in front of it, regardless of your geographical location.
The beauty of RDP lies in its versatility. You can use it for various tasks, such as troubleshooting someone else’s computer issues, accessing your office systems from home, or running high-performance applications remotely.
RDP works by transmitting the display of the remote computer to your system, and your keyboard and mouse inputs back to the remote computer. It’s designed to work well over low-bandwidth connections by sending just the changes made on the screen, rather than the full screen.
For security, RDP uses encryption to protect the data transmitted between the remote and local computer. However, it’s crucial to follow best practices such as keeping your systems up-to-date and using strong passwords to minimize potential risks.
In short, RDP is a powerful tool that, when used correctly, can greatly enhance your remote computing capabilities.
Enabling Remote Desktop on Your PC
Enabling Remote Desktop on your PC allows you to access it from another device. Here are the steps to enable Remote Desktop on your PC:
- Open the Start menu and search for “Remote Desktop settings.”
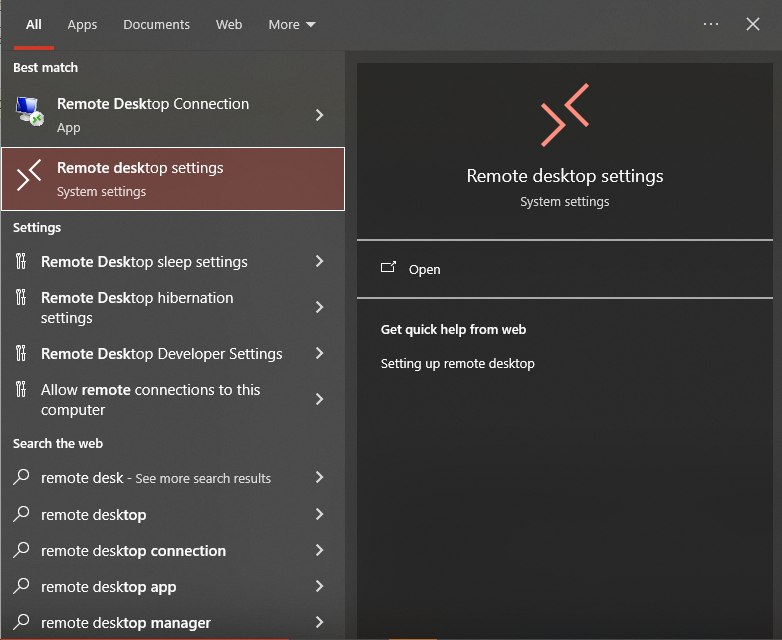
- Click on “Remote Desktop settings” to open the Remote Desktop settings window.
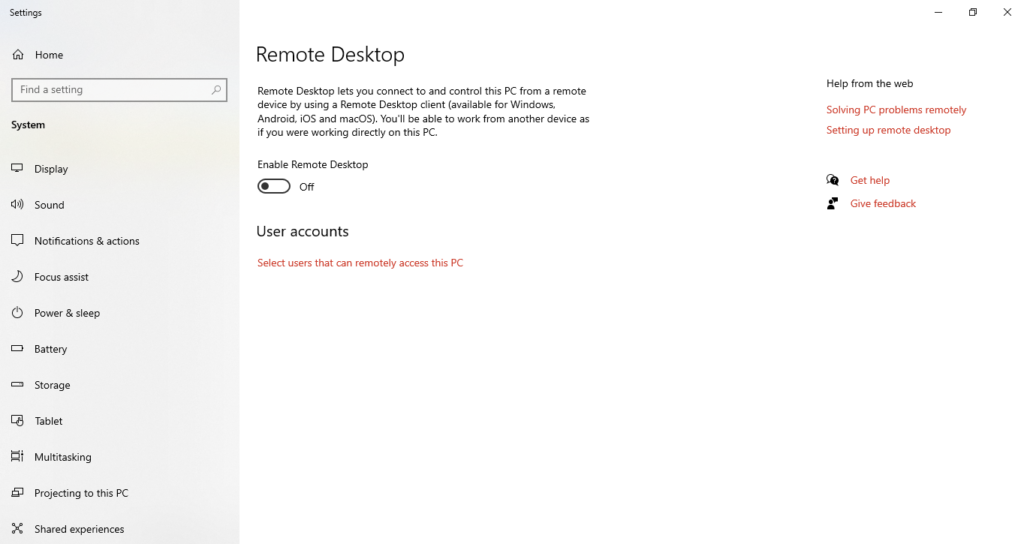
- Toggle the “Enable Remote Desktop” switch to the on position.
- If you want to allow remote connections from devices running any version of Remote Desktop, select “Allow connections from any version of Remote Desktop” under “Remote Desktop.”
- If you want to allow remote connections only from devices running Remote Desktop with Network Level Authentication, select “Allow connections only from computers running Remote Desktop with Network Level Authentication” under “Remote Desktop.”
- Click “confirm”.

Note that enabling Remote Desktop on your PC can potentially pose a security risk. Make sure to use a strong password and keep your PC updated with the latest security patches.
Grant Access to Remote Users
To allow remote users to access your PC using Remote Desktop, you need to grant them permission. Here are the steps to do so:
- Open the Control Panel and go to System and Security > System.
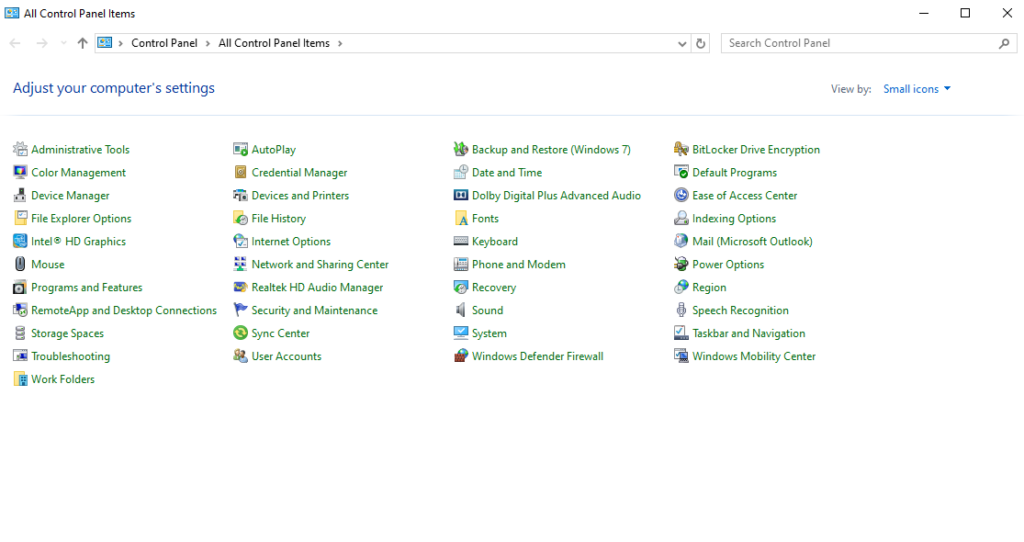
- Click on the “Remote settings” link on the left-hand side of the window.
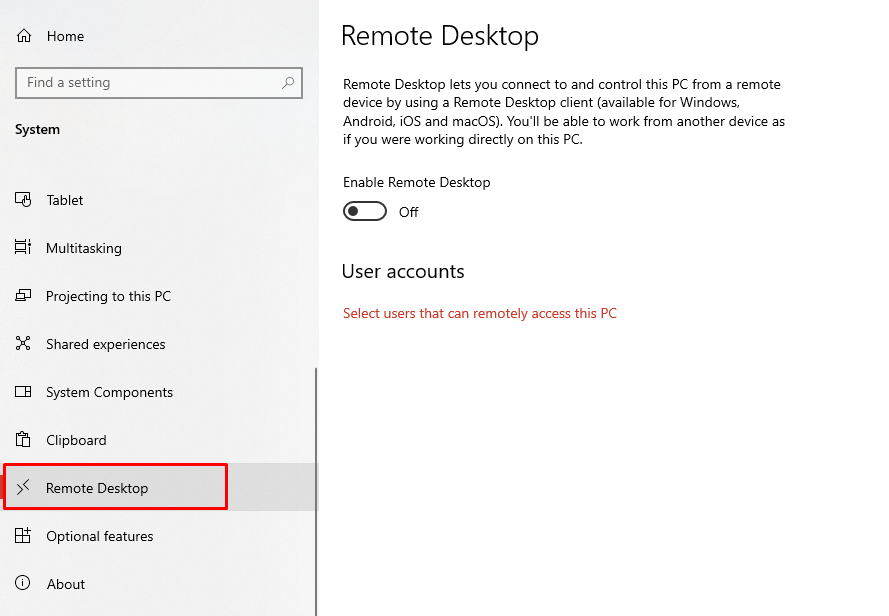
- In the System Properties window that appears, select the “Remote” tab.
- Under the “Remote Desktop” section, select the option for “Allow remote connections to this computer”.
- Click on the “Select Users” button to add the users who will be allowed to connect remotely.
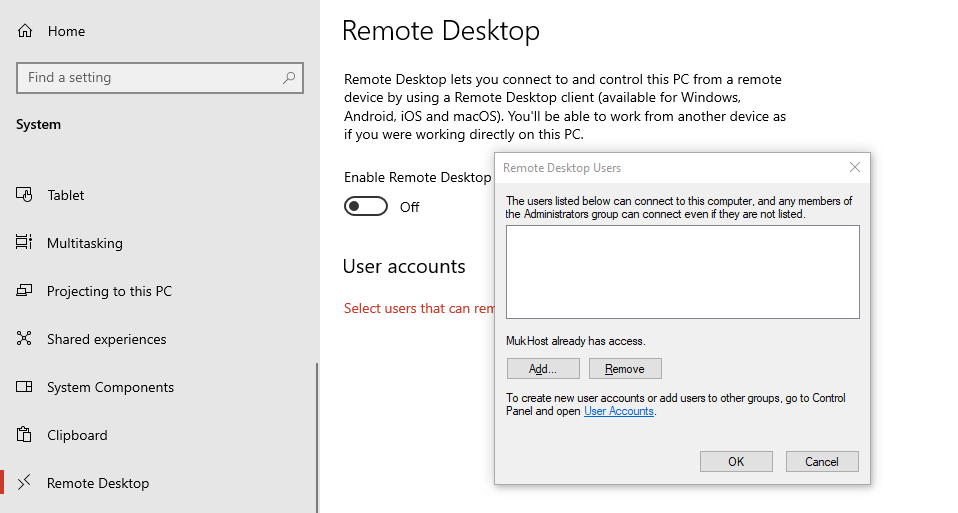
- In the Remote Desktop Users window, click on the “Add” button.
- Type the name of the user you want to add, or click on the “Advanced” button to search for users in your network.
- Click on the “Find Now” button to search for users.
- Select the user you want to add and click on the “OK” button.
- Click on the “OK” button in the Remote Desktop Users window to save the changes.
By following these steps, you can grant remote access to specific users and ensure that your PC remains secure.
Connect from a guest computer
To connect to a remote desktop from a guest computer, you will need to follow a few simple steps.
The first step is to ensure that the guest computer has a stable internet connection. It is also important to ensure that the computer meets the minimum system requirements for the remote desktop software.
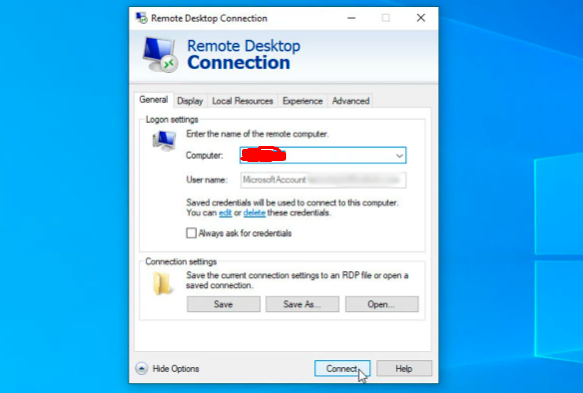
Once the guest computer is ready, the user can download and install the remote desktop software. There are several options available, such as Remote Desktop Connection,
TeamViewer, and Chrome Remote Desktop. Each of these software options has its own set of features and benefits, so it is important to choose the one that best suits the user’s needs.
After installing the software, the user will need to enter the IP address or hostname of the remote desktop computer. The user will also need to enter the login credentials for the remote desktop computer. Once the user has entered this information, they can connect to the remote desktop.
It is important to note that connecting from a guest computer may require additional steps, such as configuring firewalls or port forwarding. The user may need to consult the software’s documentation or seek technical assistance to ensure that the connection is secure and stable.
Overall, connecting to a remote desktop from a guest computer can be a convenient and efficient way to access files and applications from a different location. By following these simple steps and ensuring that the connection is secure, users can enjoy all the benefits of remote desktop technology.
Troubleshooting Common RDP Issues
Dealing with Connectivity Problems
One of the most common issues with using Remote Desktop is connectivity problems. This can be caused by a variety of factors, such as network connectivity issues, firewall settings, or incorrect login credentials.
To troubleshoot connectivity issues, users should first ensure that their network connection is stable and functioning properly. They can do this by checking their internet connection and making sure that they are connected to the right network.
- If the network connection is stable, users should then check their firewall settings to ensure that the RDP port is open. This can be done by checking the firewall settings in the Control Panel or by contacting the network administrator.
- If the firewall settings are correct, users should then check their login credentials to ensure that they are correct. This can be done by checking the username and password and ensuring that they match the credentials provided by the network administrator.
Resolving Screen Resolution and Performance Issues
Another common issue with using Remote Desktop is screen resolution and performance issues. This can be caused by a variety of factors, such as outdated graphics drivers, low bandwidth, or incorrect display settings.
To troubleshoot screen resolution and performance issues, users should first check their graphics drivers to ensure that they are up to date. This can be done by checking the device manager or by downloading the latest drivers from the manufacturer’s website. If the graphics drivers are up to date, users should then check their bandwidth to ensure that it is sufficient for Remote Desktop. This can be done by running a speed test or by contacting the network administrator. If the bandwidth is sufficient, users should then check their display settings to ensure that they are correct. This can be done by adjusting the screen resolution and color settings in the Remote Desktop settings menu.
Overall, troubleshooting common RDP issues requires some technical knowledge and troubleshooting skills. By following the steps above, users can resolve connectivity, screen resolution, and performance issues and use Remote Desktop to its full potential.



I just like the helpful information you provide in your articles
Good post! Keep up the great writing
Very well presented. awesome and thanks for sharing the content. Keep sharing and keep motivating others.